
Our blog is always harping on about securing your WordPress server – did you know that a lot of attacks are because of poor security on your physical server? If you are running a Plesk based server you can use the 4 steps below to secure your server.
As always the main caveat to any demo is to ensure that you have a complete, up to date back up of your server before continuing.
- Set the Security Policy
- Install and configure the firewall
- Install and configure Fail2Ban
- Install and configure Web Application Firewall
Initial Steps
We first need to check that the necessary components are installed:
- Click Tools and Settings
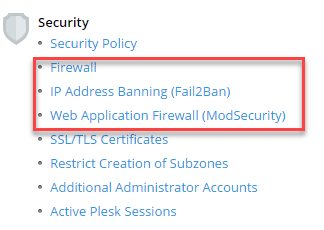
- Make sure that the options in the red box are shown in the list under Security:
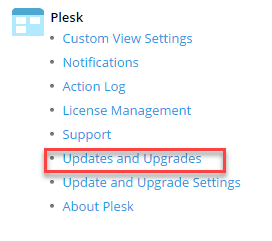
- If not, click Updates and Upgrades under Plesk, this will open a new tab:
- From the list of components shown ensure that
Fail2Ban is checked to be installed
Web Hosting\ModSecurity is checked to be installed
Plesk Extensions\Plesk Firewall is check to be installed - Click Continue, the installation of the components will now take place
- Once complete close the tab, refresh the page and check that all the components above are installed.
Part 1 – Set the Security Policy
The security policy controls 2 important parts of the security of your server, the first being FTP and the second being the minimum password requirement. These should be set as shown below:
FTP should be set to Allow only secure FTPS connections:

Password minimum requirement should be set to at least STRONG:
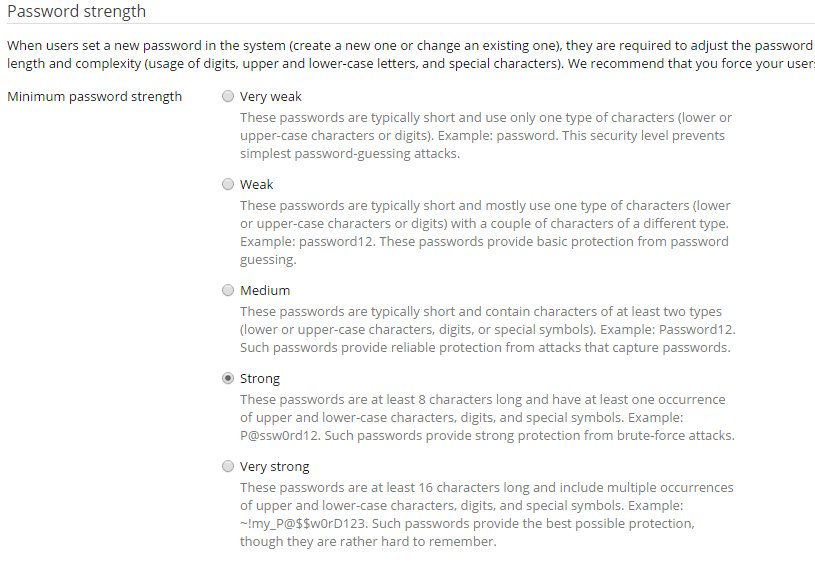
By implementing these 2 settings alone you have helped secure your server against brute force attack on the main login and via FTP.
Part 2 – Configure the Firewall
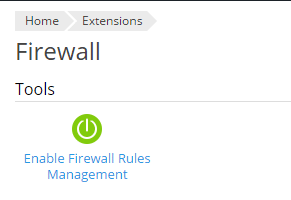
The Firewall control what connections are allowed and which ones are blocked, we can also allow connections only from select IP addresses. The steps below will show you how to enable the Firewall Rules Management and configure the basic options:
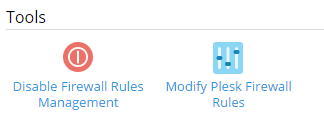
- First let’s enable mangement of the rules, simple click the Enable Firewall Rules Management icon:
- Confirm by clicking Enable on the next screen:

- Firewall Rules Management should be enabled, you should see a confirmation message at the top:

- We recommend that you only allow ping and SSH access from your static IP address, if you need to allow SSH from multiple locations look at install Duo 2FA on your server:
- Click Modify Plesk Firewall Rules
- Click Service: SSH (secure shell) server
- Click Allow from selected sources, deny from others, Enter your external IP address in the Add IP address or network:
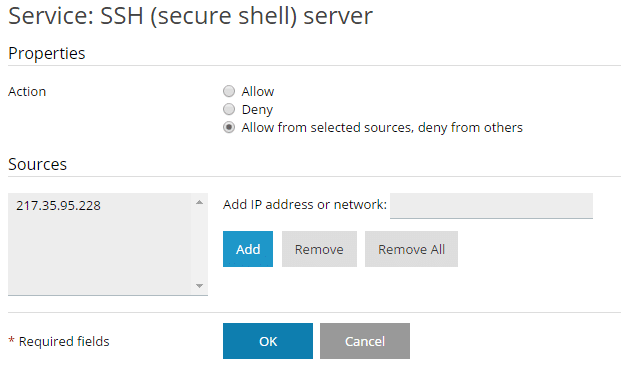
- Click Add
- Click Ok
- Repeat the steps for the Ping Service
- Click Apply Changes
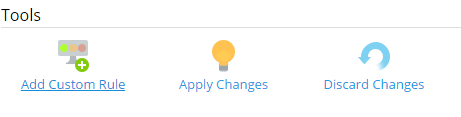
- Click Activate
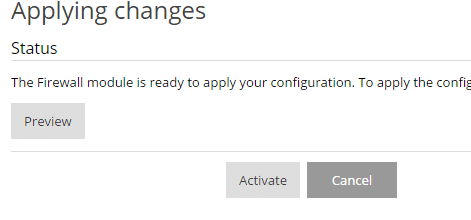
You have now protected your server from SSH connections from any IP other than your static IP and blocked all ping requests except from your office. NOTE you should only enable these rules if you have a static IP address assigned to your internet connection.
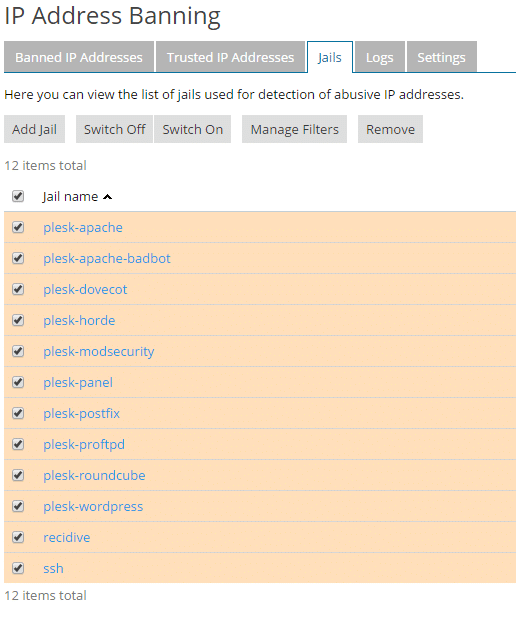
Part 3 – Configure Fail2Ban
Fail2Ban protects your server against brute force attacks. We are going to setup Fail2Ban to ban any IP address that malicious traffic originates from:
- Click IP Address Banning
- Check Enable intrusion detection
- Change the IP address ban period to 86400 seconds (24 hours)
- Leave all other settings as default

- Click Apply
- Click the Jails tab, the jails are the logs that Fail2Ban is monitoring
- We are going to turn them all on, check the box next to Jail Name (this will select all the Jails)
- Click Switch On
- We recommend that you add your IP to the Trusted IP Addresses list, click the Trusted IP Addresses tab
- Click Add Trusted IP
- Enter your static IP and click Ok
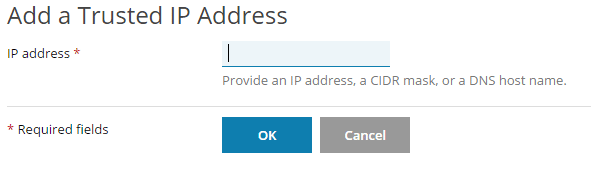
- Your IP will now be listed in the trusted IP address list
Part 4 – Configure Web Application Firewall (PAF)
The PAF service is modsecurity, we are going to configure the Atomic Base ModSecurity rules, these protect your server and sites against:
- SQL injection protection.
- Cross-site scripting protection.
- Remote and local file injection/inclusion attack protection.
- Command injection protection.
- Limited virtual patches (The Complete rule set includes all virtual patches. Refer to the following article for explanation what is a virtual patch: https://atomicorp.com/jitp).
There are other options available including the complete Atomic ModSecurity rule set, but this requires a subscription.
Follow the steps below to turn on the PAF and enable the basic rules:
- Click Web Application Firewall
- Click On
- Click the Rule Set required, we recommend the Atomic Basic ModSecurity at a minimum
- Leave all other options as default
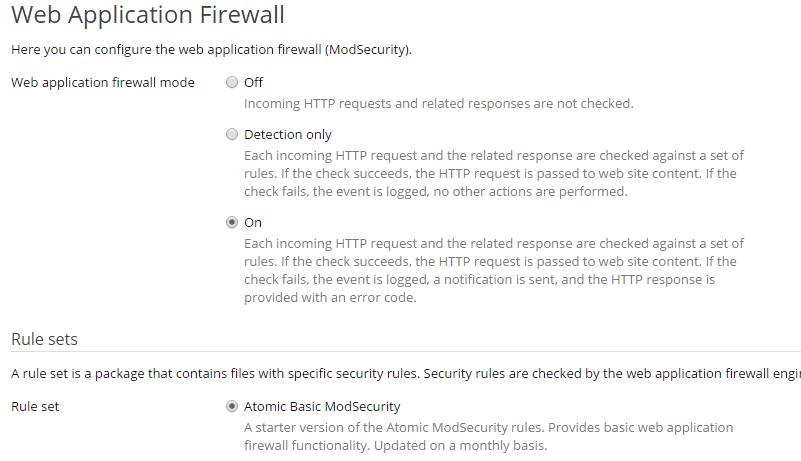
- Click Ok
- The rules will now be applied

That’s it – your Plesk server and the websites running on the server are now protected. This is a basic guide to setting up security on your server and is the minimum we recommend, we configure all our Plesk servers with this setup. So if you want to be sure that your hosting is secure why not get us to setup a Plesk server on the cloud provider of your choice or let us host your server for you on our platform, powered by Plesk on Vultr Cloud Servers. Want to find out more? Simply call us on +44 1622 320340 or click the button below to find all the ways you can connect with us:
Contact Us


Join the discussion One Comment
great post! also good to mention:
1) Use the Plesk Security Advisor (free)
2) Use the mod security rules form Atomicorp (free and $$)
3) Use CloudFlare WAP (free and $$)
4) Use Datagrid Extension (free)
🙂